Here are the 4 main points to be discussed on this topic:
- Squat Variations and Biomechanical Differences
- Works the ENTIRE body in different degrees
- Individual Mobility and Structural Differences
- Squat Training Progressions and Programming
The first two points, as you may already know were discussed in Part 1. If you have not read it yet, please read at this link: http://mpowerconditioning.com/Site_2/Blog/Entries/2015/7/30_Breaking_Down_the_Squat_-_Part_1.html
On to Part 2…
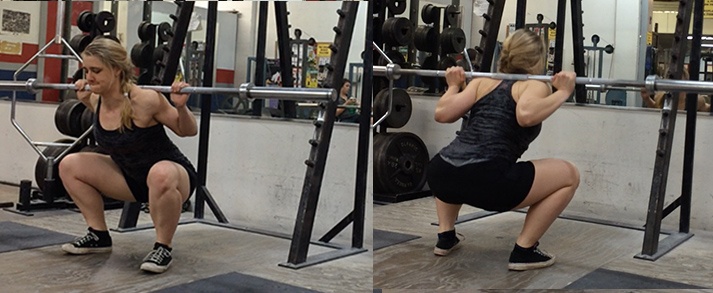
Before moving on to Section 3, I feel the need to discuss squat technique since it is the crucial factor in squatting successfully and safely! First, we will look at poor squat technique in the picture below and determine the errors and possible risks:
Poor Squat Form

What’s wrong with this picture?
major knee valgus (caving inwards) = major stress on knee joints
excessive forward torso pitch = major stress on sacrum, lumbar and thoracic spine (lower and mid-back)
excessive cervical extension (head tilted back) – not necessarily wrong for all people = stress on cervical spine (neck)
Correct Squat form

Features of excellent back squat form:
knees apart, tracking with toes
appropriate torso angle
straight spine, including head in neutral position
Correct form will greatly lower the risk of injury, especially the lower back, but will also often reduce the severity of injury, if it should occur. Also, proper technique reaps much better physical benefits and physiological adaptations via training the muscles, joints and connective tissue in a more balanced fashion reducing stress on any particular joint or area of the body. Just remember, correct form does not eliminate injury risk it will decrease it very significantly, especially as one ages, so there is always some level of risk regardless.
Individual Mobility and Structural Differences
It is my opinion, based on my knowledge through education and, especially through experience, that not everyone can squat the same nor is there an ideal universal squat technique. For one, each person has different flexibility and mobility levels, which effect the angles and depth of an individual’s squat pattern. However, these conditions can be improved through mobility and corrective drills but more importantly by practicing the squat itself frequently and correctly. And there are certain muscle groups that can effect the squat pattern, including the soleus, one of the calf muscles.
The soleus is a muscle that is active in causing plantar flexion (toes point down) of the ankle while the knee is in flexion (bent). Therefore, a person with short/tight soleus will have limited ankle mobility and therefore limited ability to squat deep correctly. In order to compensate for this limitation, he/she will often pitch the torso forward to maintain balance, as shown below.

You can see the image on the right shows much more torso pitch due to lack of dorsiflexion of the ankles. If the there is a lack of mobility at a joint(s), the body will find it elsewhere, such as increased hip flexion compensating for the lack of ankle mobility, resulting in increased forward torso pitch. This also results in more shear force across the lumbar spine (lower back), which means a higher risk of lower back injury. Interestingly, in kinesiology, the study of human movement, the only joint that flexes in both directions, I believe, is the ankle: dorsi flexion (toes up) and plantar flexion (toes down), unlike other joints that flex and extend such as the knee or elbow.
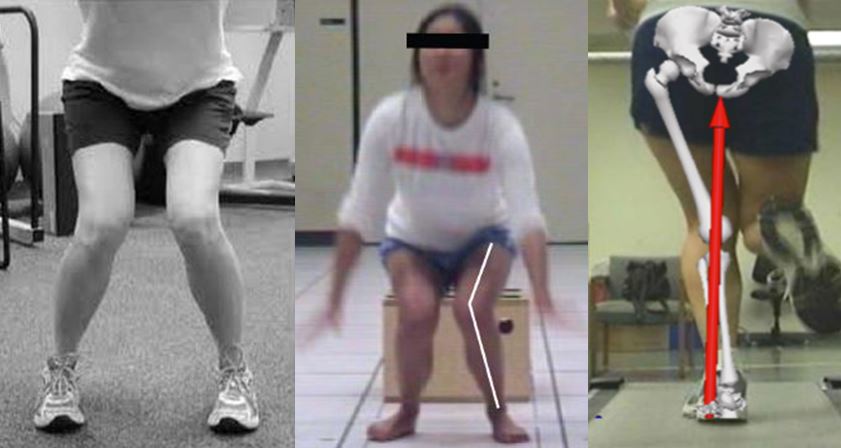
Another compensation resulting from short/tight calves is the feet splaying outwards, heels coming off the floor and the knee valgus (caving in), as in the picture below.

The problem with this compensation is that it puts excessive stress on the inner knees, in terms of connective tissue the cruciate ligaments. It can also put stress on the inner ankles, as seen in the picture. However, a compensation like the one above may not necessarily be caused by short/tight calves but perhaps by lack of hip mobility or simply improper technique.
Not only have I seen and dealt with squat technique abilities and limitations of others, I have experienced it myself. My squat stance has to a be on the wider side since I cannot go very deep with a narrow stance; with a narrow stance my hips will only flex to a certain point before my lower back and pelvis tuck under into a position some people call “butt wink”. In the past, especially with a lot of weight, I would sometimes get irritation and pain after doing squats so I recently widened my stance and transitioned from high bar to low bar squats. Not only do the squats feel better and more natural for me I no longer have resulting pain or irritation around my Sacroiliac joint area afterwards.
Skeletal Hip Structure
The next portion of this topic goes into something not often discussed or even considered in regards to squatting, although it can be a crucial factor in how an individual squats or should squat with load. The structure of the pelvis, especially the positioning and angle of the hip socket (acetabulum). The pelvis on the left one can see the hip sockets visible from the front, while they are not visible on the right one; they will very likely have different looking squats or at least be more comfortable in particular stances and at certain depths. You can figure that the angle or position of the sockets can determine how a person will squat; due to a bony blockage at each socket, the pelvis on the right may not allow for a narrow stance as well as the left.

Other structural differences can be seen in the femur (upper leg bone), specifically the femoral head (ball) which articulates at the acetabulum (socket) of the pelvis creating a ball and socket joint, which allows potential for a great range of motion. In the two pictures below, the size and angle of the femoral heads of the respective femurs are different and would surely effect the manner in which they would move at the joint, therefore, in the squat also.


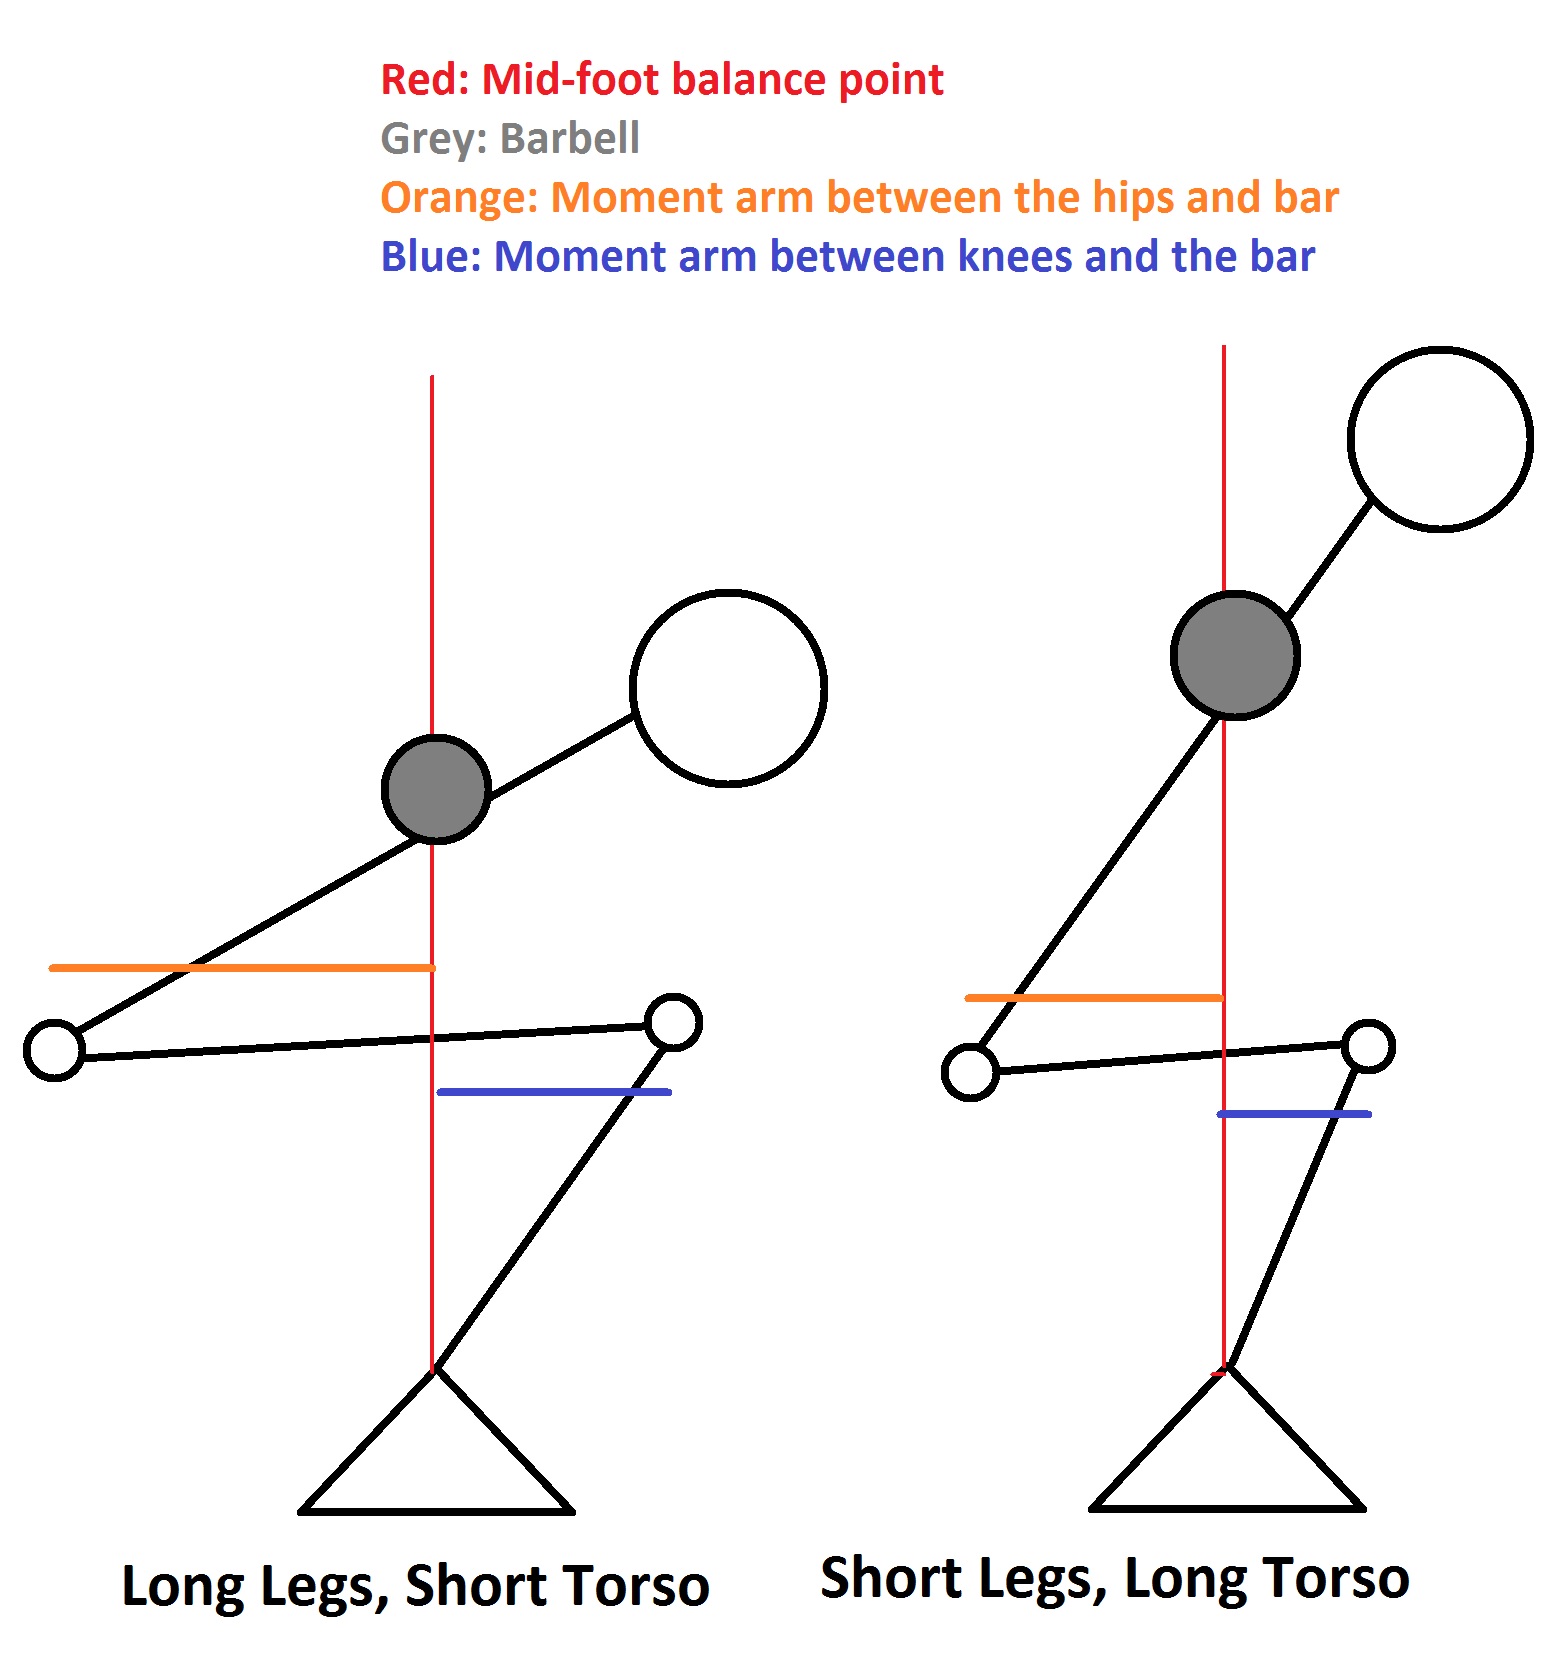
Another factor that I have heard and have dealt with in training clients is long femur length. An individual with a relatively long femur combined with a short torso potentially has more problems than someone with more average proportions. Due to the proportional longness of the femur, the torso is forced to pitch more forward in order to keep the bar over the mid-foot, where the bar should be aligned. You can probably guess that it would be harder on the lower back.
However, in biomechanical terms, what force(s) could actually cause lower back issues/injuries, in the picture below?
a) compression
b) shear
c) traction
d) a+b
e) b+c

Answer: d (compression + shear)

In light of this, chances are that a front-loaded squat variation would be lower risk or if a back squat is needed, a high-bar variation would be a better choice since there is less forward pitch required. It may also be a case in which the individual may not be able to squat safely at a greater depth. In the case of my client, the front squat to parallel depth worked out well since back squats caused back and knee pain.
4) Squat Training Progression and Programming
If you are new to the squat or need to relearn or even reinvent your squat technique I suggest going about it in a gradual and progressive manner, mastering each variation before moving on to the next.
Squat Variation Progression
Goblet Squat (weight = 5-15% bodyweight females, 10-20% bodyweight males)
Kettlebell or Dumbbell Front Squat (weight = must be able to do 10 reps/set with proper form)
Barbell Front Squat
Back Squat (optional)
Overhead Squat (optional)
Programming
1) Goblet Squat (weight = 5-15% bodyweight females, 10-20% bodyweight males)
– 3 x 10, REST 90s
do for 3 weeks 2-3x/week, gradually increasing weight within bodyweight % limits each week, if needed
2) Double KB or DB Front Squat (weight = must be able to do 8-10 reps/set with proper form)
3 x 8-10, REST 90s
start with a weight about 20% higher than your goblet squat weight, for example, if your Goblet Squats were 30 lbs, then try 40 lbs (20 lb KBs in each hand)
– do for 3 weeks, 2-3x/week, adding small increments each week: progress from 2 x 20 lbs to 2 x 25 lbs or 30 lbs, depending on your strength increase

3a) Eccentric (down phase) Focus Barbell Front Squat – 3 x 5 (5-sec eccentric), REST 90s
ensure proper shoulder and upper back mobility for proper bar position (CRUCIAL!)
begin with a weight no more than half your bodyweight (if you weigh 200 lbs, perhaps choose 95 lbs)
remember, if you are new to front squats it is not about stacking on the poundage at first, it is about proper form and control (stability)
do for 2 weeks, 2-3x/week focusing on technique and eccentric control, add 10-20% weight in 2nd week
3b) Barbell Front Squat – 3 x 8 (3-sec eccentric), REST 90s
resume with the previous week’s weight
do 2x/week, every week add 5-10 lbs for 4 weeks, then do a lighter weight or different squat variation for one week
resume the next week (week 5) with the weight from week 3 and do another 4 weeks adding 5-10 lbs
consult a trainer to progress beyond this point or move to back squat (if anatomy and mobility allow for it)
4a) Eccentric Focus Barbell Back Squat – 3 x 5 (5-sec down phase), REST 90s
– do 2x/week for 1-2 weeks
– use about 75% of weight achieved in front squat (if you worked up to 155 lbs use 115-120 lbs for back squat)
4b) Barbell Back Squat – 3 x 8 (3-sec down phase), REST 90s
– start with 10-20% additional weight from Eccentric Back Squat
follow same progression as Barbell Front Squat
– after 10 weeks, if your start weight = 135 lbs, end result = 160-185 lbs
estimated 1-rep max = 200-230 lbs
5) Overhead Squat – 4 x 5, REST 90s
be sure to have the requisite (sufficient) shoulder mobility, if not consult a kinesiologist or strength coach
– start with an empty barbell (45 lbs) and slowly progress adding 5 lbs/week or as appropriate, do 1-2x/week
in order to maintain squat strength continue to train the front or back squat 1-2x/week
Wrap-up
I understand there is an abundance of information we have covered on the squat so please take it step-by-step and not rush into making lifting heavy weight your main goal when starting out. Make technical proficiency and gradual progression your main goals, if you are starting out or correcting an incorrect/dysfunctional squat pattern. Also remember that if you are feeling pain or unsure of your technical competency, as I repeat myself like a skipping CD, please consult a qualified professional such as a strength coach or well-qualified trainer. Happy squatting!!
